A chance to get creative
For musicians, the pandemic and travel restrictions can provide a much-needed break from normal life and give you some time to do what you love the most. Since being stuck at home, I have been entirely consumed with getting my band’s demo list and songs up to scratch. Home recording has provided me with a welcome distraction, in a colourful and happily all-consuming private universe.
Recording on a phone or computer
Firstly, you should think about how seriously you want to take the recording process. With modern technology we now all have some form of recording apparatus. All phones and computers have small microphones built into them and often come with a recording app, such as the ‘voice memo’ app on iPhones.
If you are an aspiring singer-songwriter but have never played to an audience before, there is no better way to start than recording yourself onto your phone or computer. You can listen back, see what can be improved and then try again. It is a priceless tool in aiding self-improvement, and all can be done behind closed doors.
Where to begin?
You want to best represent your wonderful talent, so there are a few important considerations
Before you start an audio-visual (sound and video) recording:
- check how the video looks and that the microphone works;
- if able to do so, check the levels by playing the loudest parts of your music and listen back to it. Does it sound distorted? Does it sound like it is clipping? Does it sound too loud or too quiet? You may need to decide on putting the microphone/recording device either nearer to you or further away;
- make sure you are well lit using either lamps or light from a window, and check the angle of the video. Take a photo in-situ and see whether it is at the best angle. Ask yourself: can they see me playing? Should they be able to to see the keyboard if you're playing the piano? Can they only see my legs? Can they see up my nose? Adjust if you need to and off you go;
- make sure the room is presentable, as there is nothing worse than seeing your dirty dishes or an under-watered plant in the background;
- although this is a performance and you should make sure (if recording video also), remember to make yourself comfortable as this will also better your playing. The lens can sometimes be a daunting thing to play to, so make sure you are comfortable as this will translate on the other end. This does not mean however that you can slouch on a bean-bag, playing your pyjamas. This is a performance after all!
Top tips
As smartphones have become part of our everyday lives and they can do almost anything, we often overlook that there are a few ways in which we can get the best video quaility from them. Here are a few helpful ways to get professional quality video from your smartphone:
- Record video and audio separately: This may seem silly as phones now have the capability to do both at the same time. But trust us when we say that doing this separately will provide the best quality for both audio and visual. More often than not, the audio will be the priority for a musician, so recording this separately and then miming to the playback to capture your video content is the best method. There is a separate section on achieving this - Sync your audio to your video -further down the page.
- Good lighting is critical: Proper lighting has a huge impact on smartphone cameras because they have smaller image sensors and lenses. Try as much as possible to shoot your video in brightly lit areas. This will help avoid unnecessary shadows and grainy areas in your video. Conversely, you also must be careful not to point the camera directly at bright light sources, which will cause unusable overexposed footage and lens flaring. Lighting should be stable and steady; the image sensors in most smartphones do not react to dramatic changes in lighting very quickly. If the light is still making it tough to shoot your video try working with back-lighting and white balance settings if your phone or app provides them.
- Getting close up: Staying physically closer to your subject ensures better image quality, less digital noise, and better focus in your videos since most smartphones use a digital zoom rather than optical zoom.
- Avoid vertical video syndrome: I really cannot drive this point home well enough. Stop shooting vertical video! Some videographers, (yes… video entrepreneurs, too) who use of their smartphones for digital filmmaking often make the mistake of holding their phones vertically, that is to say up and down rather than sideways, while recording. Hold your phone horizontally so that videos played back on other screens (virtually everywhere) will look fine.
Since March 2020, music groups have found new and creative ways to connect and create music with one another during these times of separation. To get this right and of a standard you and your music group want, the process to create/edit videos and bringing lots of remote recordings together can take time. However, check out these tips for pulling together a recording of multiple tracks/parts to get you started:
- Consistency is key: Ensure all your band/group members are using the same method of recording audio and visual elements, and stick with it. It will be difficult in the editing process if one person has recorded their individual performance in selfie mode on a smartphone, whilst another has recorded it in their home studio with 4K dual-camera shot. Choose a method and make sure that all your group members are comfortable and able to do it that way. As mentioned elsewhere on this page, a lot can be achieved with just a smartphone. Also, consider the look of it: do you want everytone wearing the same colour? Should everyone record against a blank wall? Considering these things now will help how professional the final product will look.
- Tune up: Do not forget that everyone's instruments need to be in tune, dependent on which recording method you use (outlined below), you may need to provide a single tuning note (as an audio file sent around the team) for consistency across all players.
- Assign your project manager: There will need to be one person who oversees your recording project, as this can often be quite a big project with lots of moving parts (especially if you have a large music group). This person will be the one to check the consistencies, assign parts, create any supplementary materials (like a click-track) and edit the final product.
- Preparation is key: Do not allow your group members to record unaided with no tempi or indictation to guide them. It will become a lifetime project to edit 20-50 separate audio-visual files together when everyone has chosen their own tempo. Therefore there are three methods to counter this:
Click-track method: This can be your best friend when it comes to remote recording for music groups. Create a click track through DAW software, notation software like Sibelius (export audio of a woodblock beat), or by using an online click-track/metronome to keep people in time such as Metronomer. If the music is not in a consistant tempo (changes tempo), you may need to plan ahead and have people record in chunks or provide an advanced click-track created through DAW software. To best utilise this method, performers should still follow the guidance in Sync your audio to your video;
Layering effect: This is frequently used by classical music ensembles, as it allows instrumental groups to hear their colleagues and add layers/parts over the top of an existing recording. Think of it as pass-the-parcel. Here, an instrumentalist or singer with a consistent part (very few breaks) records their own part and then passes it on for the next person to sing along with it. This method is particularly good for intonation and ensuring that there is an homogenised sound. To best utilise this method, performers should still follow the guidance in Sync your audio to your video;
The Playalong: This is used by youth groups to professional ensembles alike, and it's a simple one. Record yourself (whilst following the advice elsewhere on this page) playing or singing along to an agreed exisiting track. Perhaps there's an existing recording by one of your favourite bands/choirs/orchestras/artists that fits the bill, with a good tempo, that your music group can all use as a guide track for your remote recordings. Hopefully, all you need to do in editing is align the 'claps' and we should be near to a finished product.
There are so many tried-and-tested ways of pulling together audio and video recordings of music groups, so why not ask your friends and colleagues to see whether they have any advice too?
Recording audio and video separately is the best way to ensure a higher quaility recording. Record your audio on a separate device (like a Zoom or Tascam hand recorder), using a microphone straight into a computer, or even on your 'voice memos' app on a smartphone, and then edit this on top of you video recording using video editing software such as iMovie, Final Cut Pro X, Adobe Premiere, Movie Maker 10, Movavi, Lightworks, or DaVinci Resolve.
Step-by-step
- Record your audio (tips above on how to best do this). Don't forget: Before recording both audio and video, you will have to clap your hands twice at the beginning of each audio and video recording. This means it will be easier for you to edit them together (matching up the claps). Although you may not need to or want to, you may wish to edit the audio at this stage (e.g. edit reverb, edit out any blemishes or retakes, etc.)
- Record your video (tips above on how to best do this). The one thing you need to do here is a bit of acting! Mime or play-along with your audio recording you just created, so that the actions and movements reflect the audio. Don't forget: Before recording both audio and video, you will have to clap your hands twice at the beginning of each audio and video recording. This means it will be easier for you to edit them together (matching up the claps).
- Now, transfer your files to your desktop/laptop. You can either plug your device into your desktop/laptop through USB connection, email them to your server and download them or 'AirDrop' them for Apple users. The files should appear in your 'Downloads' or on your 'Desktop'.
- Open your video editing software such as iMovie, Final Cut Pro X, Adobe Premiere, Movie Maker 10, Movavi, Lightworks, or DaVinci Resolve. Many of these are free to use.
- Drag your video file onto your video editing app/screen.
- Drag your audio onto your video editing app/screen. This should appear either above or beneath your video file and may look like this.
- We have to line up the sound now. Remember the claps you had done at the beginning of each recording, we can check the waveforms on each track to line them up, which may look like something like this. Note that a clap is loud so should be quite prominent in your waveforms.
- Now mute the audio of the original video track and play from the beginning. You should be able to hear you audio track playing alongside your video. If they appear a little out of sync, you may have to toggle the audio recording a little to ensure what it being played/sung/spoken reflects the image.
- You have now successfully synched your audio and video. You may wish to edit the video further with titles, filters, crop sections or change audio/visual quality. Now you can save or export the video (.mov, .mp4, .wmv., are the best if you have an option).
If you want a clearer and more professional sound, with a small financial investment you can get closer to a professional recording.
There are two things that you’ll need to think about:
Firstly, gathering your equipment, which usually includes:
- a computer or laptop
- a music recording programme aka a DAW (digital audio workstation)
- a recording interface (an external sound card)
- a microphone
- speakers
- headphones
- a jack to jack lead
- an XLR lead
Secondly, developing a basic understanding of the science behind microphones and audio recording. For example, knowing where to position a microphone at an instrument or mouth will greatly affect the sound produced.
Developing your skills
Once you begin this musical recording journey, you’ll find yourself slowly learning more and more about the processes that enhance your music and creativity. Not only will you improve your sound, but you will also learn to use the recording process as an extension of your creative mind. You only need to look at the genius of great musicians like Brian Wilson or George Martin to see how much a good recording can positively affect the music you are trying to convey!
There are several different DAWs to consider, from the fairly basic to the highly professional. These are the most commonly used:
- Audacity: This is a free, open source, cross-platform audio software. Audacity is an easy-to-use, multi-track audio editor and recorder for Windows, Mac OS X, GNU/Linux and other devices. Although there isn't a pretty interface on this, it has everything you need to edit audio and even create music with.
- Garageband: This is an Apple DAW for macOS and iOS devices. It’s one of the most basic programmes and can be easily used to start your bedroom studio. On the app you have access to a range of digital instruments which you can use to record with, and then build layers of audio on top. However, it has some restrictions, particularly if you want to record a lot of instruments.
- Logic Pro: Also from Apple, Logic Pro is the step up from Garageband. It’s similarly easily mastered and contains the same access to digital instruments, but with an increased power for audio editing.
- Pro Tools: This is the industry standard - it’s used by most professional recording studios and is the best for audio editing. However, it doesn’t come with the same variety in digital instruments and therefore wouldn’t be my suggestion for new starters.
- Ableton: It’s fantastic if you write with musical loops (a drumbeat, or melody that is continuously looped to repeat over and over) or if you’re into electronic and dance genres.
Further reading
There are hundreds of dedicated music engineering websites and books that will help you navigate and learn how to use the equipment that I listed above. My go to website for recording tips is Sound on Sound and in terms of books, I’d recommend Mixing Secrets for the Small Studio by Mike Senior and The Mixing Engineer's Handbook by Bobby Owsinski.
If you are submitting a recording as part of your studies, assessment or examination, there may be a few things that you have to separately consider in addition or instead of the advice given on this page:
If you are a music student enrolled onto a music performance pathway at Royal Holloway, there are a few things you should consider when recording and submitting a recorded performance:
- Learn the basics: Make sure you read and fully understand the 'Where to begin?' section on this page. These basic steps will help you begin your recording process. This will cover testing sound, distance from microphone and lighting.
- Need help with recording on your phone? Check out free and very easy guide on how you can record audio on your phone (iOS and android advice available on wikiHow (link embedded).
- Want to record on your Windows laptop or desktop? If you have a Windows device and need to record audio, here is an easy, step-by-step guide on how to do just this on wikiHow (link embedded).
- No editing of sound or visual: you are to present this audio-visual recording as if live, so no tweaking of the sound or adding visual filters. If you are found to be utilising audio enhancing or editing techniques, your assessment submission may be discredited.
- Position is key: As this is for assessment, you will need to record video and audio simultaneously and you should ensure the positon of the camera and microphone is suitable. For singers and instrumentalists, the examiner will need to be able to see your head and upper body (at the very least) and keyboardists will need to position the camera to the side of the keybaord to ensure the examiners are able to see you play and (additionally preferably) your pedal work.
- All the gear, no idea: If you need some support about what equipment is helpful to you in recording through your computer or in a make-shift home studio, check out this helpful breakdown on home recording setup for beginners on MusicRepo (link embedded).
To submit a video based assignment as a student:
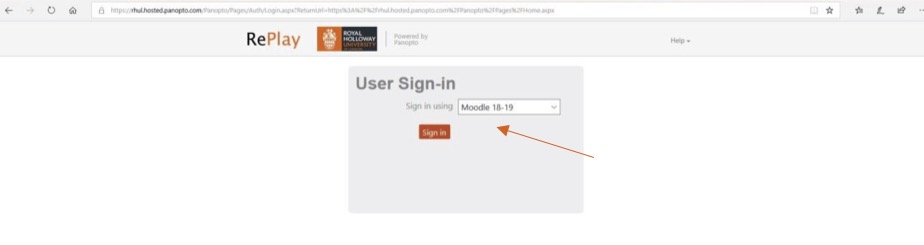
- Head to https://rhul.hosted.panopto.com/
You will be prompted to sign in, ensure that the dropdown in set to Sign in using the year of Moodle which corresponds to the academic year of the course.
If you already have a live session in the current year’s Moodle, you will be directed straight through to the Panopto homepage. Otherwise, you will be redirected to Moodle to sign in with your usual credentials before reaching the Panopto homepage.
-
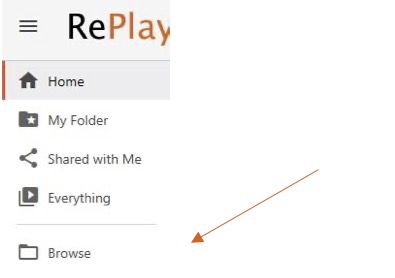
Once you have logged in, use the side bar to navigate.
-
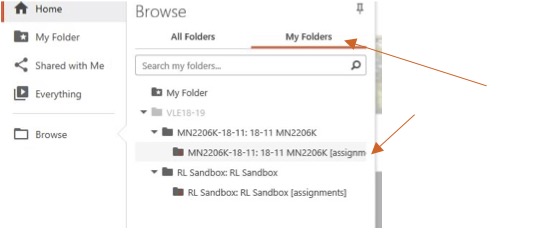
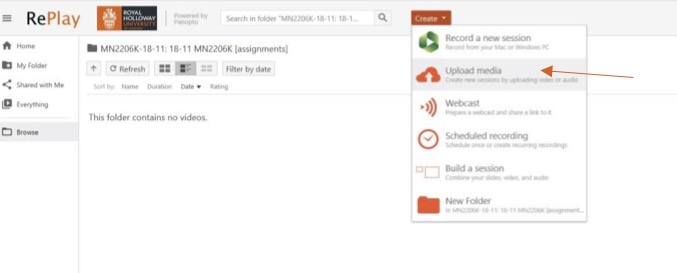
Go to Browse>My Folders> [Course Title] [assignments]
In this example we will use, MN2206K-18-11: 18-11 MN2206K [assignments]
-
In the assignment folder, at the top of the page, hit Create and then select Upload Media from the dropdown that is revealed.
-
Drag your video into the dashed area in the popup window or click the area to open the file explorer and select your file.

You will see the progress of your file as it uploads.
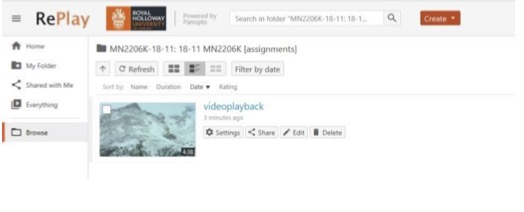
Once you see you video has uploaded, it will begin to process. This can take several minutes, so feel free to close the window.
-
You have now successfully submitted your assignment.